About Me

My photo
Chocolate and coffee make me happy!!

Tuesday, November 12, 2013

Pumpkin Tiramisu

So Tiramisu is my favorite dessert of all time.  FAVORITE!  This isn't quite like a true tiramisu, except the fact that it is layered.  Its just a name, deal with it.  There is no baking in this dessert, how easy can this be?  This is my fall go to dessert, although I've only made it a few times.  I can't believe I'm giving up the secret recipe.   But in the spirit of the upcoming holidays, I hope you will share this with your family.

Ingredients
1lb of pound/loaf cake, cut into slices (you will need about 9 slices)
2 shots of espresso
2 Tbsp Crown Royal Maple Whiskey (or any whiskey)
2 Tbsp pure maple syrup
1 1/2 cups heavy whipping cream
1/3 cup sugar
1 cup 100% pure pumpkin puree (get it in a can, much easier)
1 1/4 tsp pumpkin pie spice
1/2 tsp cinnamon

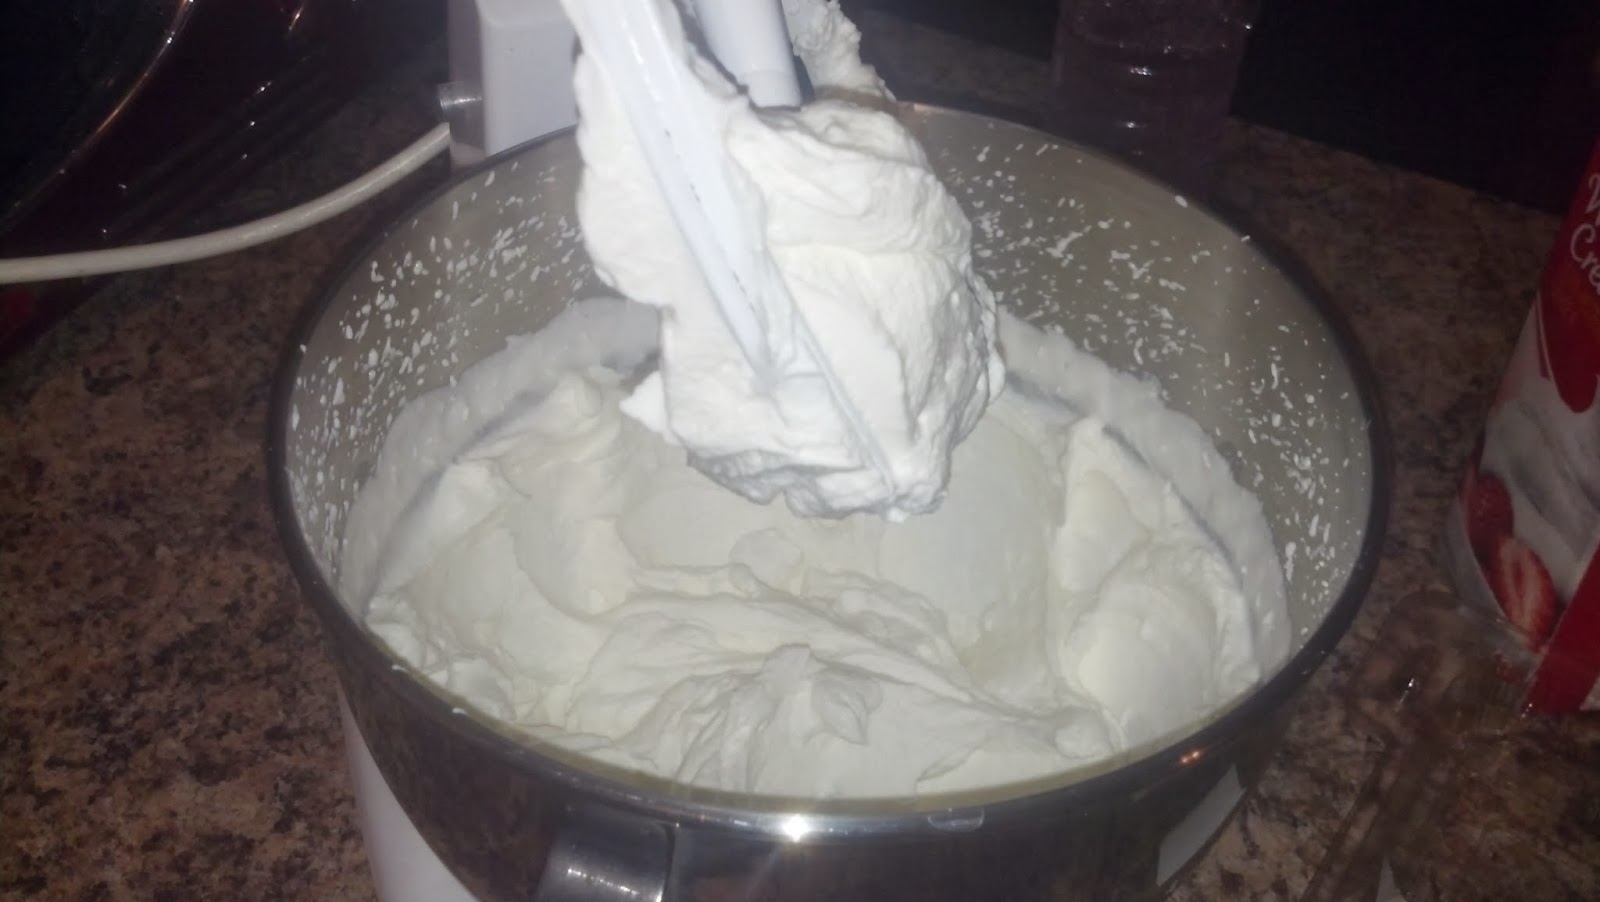
In a small bowl, mix together the espresso, whiskey, and maple syrup. Set aside.   In a separate bowl, whip up the heavy whipping cream with sugar and whip until stiff peaks form.  See below:
GENTLY fold in your pumpkin puree, pumpkin pie spice, and cinnamon.  Now let's prepare the pan.  Take a loaf pan and line with cling wrap, allowing it to generously hang over all sides.
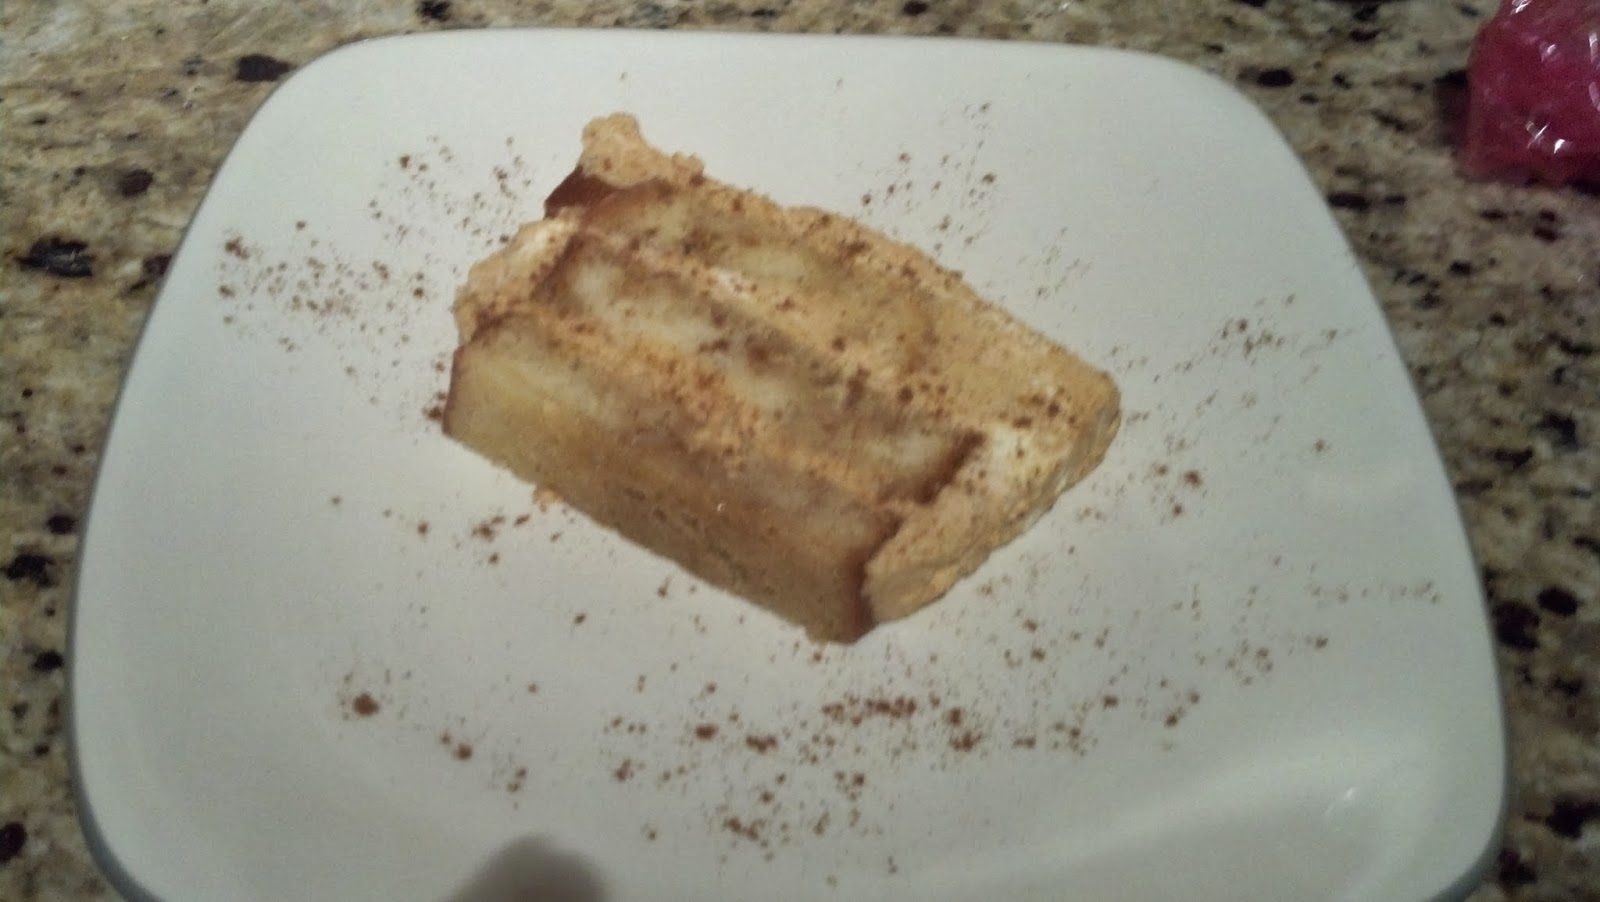
Start the layering process.  Add a layer of pound cake.  My pan took 3 slices of cake.
Using a pastry brush, brush your espresso/whiskey/syrup mixture over the cake.  There will be three layers, so figure you will use about 1/3 of your espresso mixture.  Next add a layer of your pumpkin cream.  Again use 1/3 of the mixture.
Keep it smooth.  Add another layer of cake, then brush with espresso mixture.  Add another layer of pumpkin cream.  Repeat one more time.  Your final layer will end with the pumpkin cream.  Sprinkle the top with cinnamon.  Cover with cling wrap and refrigerate overnight. 
 
When serving, you should be able to just pull this out of the pan, holding onto the cling wrap and then folding down the sides. 
Enjoy!


Sunday, November 10, 2013

Beef & Cabbage Stew

Well I decided I want to try to work with new veggies.  I chose cabbage.  What to do with cabbage?  Make cabbage rolls, make cole slaw...or make a hearty fall stew!  This recipe is easy and delicious.  Start cooking it in the early afternoon and let it simmer until dinner time!

Ingredients
2 Tbsp butter
2 Tbsp EVOO
2 medium yellow onions diced
2 cups diced celery
2 cups diced carrots
2lbs beef stew meat
2 Tbsp chopped garlic
1 cup red wine
48oz beef broth
1 large can diced tomatoes
Fresh thyme (I used about 6+ sprigs, taking off the stem)
1 tsp rosemary
2-3 bay leaves
salt and pepper
1/2 head cabbage, cut into small pieces

Heat your DUTCH OVEN and add your butter and EVOO.  Add your diced onions and celery and cook until translucent.  This will take several minutes.
Add your diced carrots.  Cook for another few minutes. Add your red wine.  I used a pinot noir.  It tasted wonderful.   
Next add your stew meat, diced tomatoes, broth, thyme, rosemary, bay leaves, and salt and pepper.
Bring to a boil then cover and simmer on low for at least 2 hours.  Give it a stir every once in a while as well.  After a few hours give it a taste, add more salt, pepper, or thyme as needed  Then add your diced cabbage. 
Cover and simmer for another 30 minutes or so.  Don't forget to remove your bay leafs!  This recipe makes a good amount of stew.  Like for real...it will probably feed at least 6 people, maybe 8.
Enjoy!!!


Spicy Tomato Cream Pasta

So I've been slack, its been a while.  I actually made this recipe weeks ago and haven't uploaded it.  The inspiration for this....my husband and I loved this small Italian restaurant back home in this farm town.  Well it was fabulous and it went out of business unfortunately.  But he always ordered this pasta called "Rigatoni de madeira", or something like that.  I'm not Italian, I just look it, so I cannot translate this for you.  But like almost everything I see on a menu, I try to recreate it.  And plus I love my husband so I just strive to make his belly happy.  This makes his belly happy :)

Ingredients:
Extra virgin olive oil
8oz diced pancetta
2 medium yellow onions
3 links of Italian sausage, cut into pieces
3Tbsp garlic
1 can diced tomatoes
1 2.25oz can sliced black olives
1 1/2tsp crushed red pepper
1 tsp diced dried basil
1 tsp crushed black pepper
Handful of fresh chopped basil
1/2 cup heavy cream
1 box Rigatoni
Freshly grated parmesan cheese
Fresh flat leaf Italian parsley

I doubled my recipe (see picture) since we were having company, so do not copy that picture ;)

Get out the trusty ole dutch oven!!  I'm telling ya-I use the heck out of my dutch oven!  Add a few tablespoons of EVOO to the bottom of the pan.  Add the diced pancetta and onions and sauté until the pancetta is slightly crispy and the onions are translucent.  Add the Italian sausage and cook thoroughly.
Next add the garlic and black olives and cook for just a minute or two.  Add your diced tomatoes, crushed red peppers, diced dried basil, crushed black pepper, and fresh basil and simmer.
  In the meantime get your water boiling for your pasta.  Don't forget to salt the water!  Follow the cooking instructions for your rigatoni.  I like mine al dente, but cook to your preference.  When your pasta is close to being done, add the heavy cream to your sauce.  Let this simmer for a few more minutes until heated throughout.
Serve your delicious sauce on your rigatoni.  Top with freshly grated parm and fresh flat leaf parsley!  Don't forget your garlic bread and garden salad too.  I had some happy tasters:


Monday, October 14, 2013

Chunky Chicken Corn Chowder

Cold, rainy and 68 degrees today.  I know, I know....I'm from Chicago and I should not be whining about 68 degrees.  It was chilly!  But it inspired me.  One of the greatest things, and perhaps one of the only good things about cold weather, is comfort food....especially soup and crock pot meals!  The best soup I have ever tasted was corn chowder from a restaurant that is unfortunately no longer in business.  And I never got the recipe.  The only thing the chef told me was "Don't be afraid to use heavy cream".  And so we shall...


Ingredients:
1 lb chicken breast, boiled
8oz bacon, diced
1-2 yellow onions, depending on the size, diced
3 Tbsp butter
1 cup celery, diced
2 cups red skin potatoes, diced
48oz chicken broth
4 cups frozen corn
1 1/2 tsp thyme
1 tsp of fresh ground black pepper (and more to taste)
2 Tbsp jalapenos, diced and seeded (I like the jar kind--not so spicy)
2 cups shredded cheddar cheese
1 cup heavy cream
Green onions to garnish

Get out your dutch oven!!  Heat your pot on medium and add bacon.  Simmer for a few minutes until the fat starts to release.  Then add your diced onions. 
 
 
Cook over medium heat until onions are translucent.  Add butter and let melt with your onions and bacon.  Then add your celery, and potatoes.  Cook over medium low heat for about 5 minutes, letting all the flavors marry. 
 
 
Add chicken broth and bring to a boil.  While your soup is coming to a boil, dice up your chicken into small pieces.
 
 
Add diced chicken, corn, jalapenos and seasonings (thyme & pepper) to your soup.  Bring back up to a boil.   Slowly stir in cheddar cheese, stirring constantly.  After the cheese is melted and well combined slowly add your heavy cream.  Let simmer for a few minutes and serve!  Garnish with chopped green onions for extra flavor.
 
 
Alternative Ideas
 *Go Low-Carb by omitting the potatoes (Possibly Paleo too!)
 *Give it a smoky flavor by roasting the corn and the jalapenos before adding to the soup


Sunday, September 15, 2013

Cheesy Broccoflower Soup

It was 90 degrees today.  And we spent the day at the beach.  What's for dinner?  How about I have a taste for soup!  I guess I'm ready for fall and all the soups, stews, and pot roasts that come along with it.  Let's roll....

Ingredients
3 slices of bacon
1 medium onion, chopped
1 1/4 cups chopped carrots
64oz chicken stock
1 head fresh broccoli, florets cut off
1/2 head fresh cauliflower, florets cut off
1 1/2 Tbsp garlic
1 cup heavy cream
2 cups shredded cheddar cheese
1 tsp fresh ground black pepper
1/4 tsp fresh grated nutmeg
 
Get out your dutch oven!!!  I cannot express how much I love and use my dutch oven.  It is perfect for soups!  Add bacon, chopped onions, and carrots and simmer until veggies are softened. Do not let your bacon get crispy. 
Make sure your broccoli and cauliflower are all cut into florets.
These bowls are two different sizes.  I realize it looks like a lot of cauliflower, but it's just a smaller bowl.  Add broccoli, cauliflower, stock, and garlic to the pot.  Simmer on medium low for 20-25 minutes until veggies are nice and soft.  Get your food processor out...this is another wonderful item to have.  LOVE my food processor.  You will need to scoop out the veggies and very little liquid to put in batches in your food processor.
Looks at this steaming!  When you are scooping out the veggies, make sure you get ALL the bacon, but leave a little of the carrots, broccoli and cauliflower in the pot so your soup is just a little chunky.  Return pureed mixture back to your dutch oven.  Add heavy cream and stir well.  Next add cheese, pepper, and nutmeg.  Stir very well so the cheese melts and incorporates well.  You may need to add some salt and pepper, based on what you like.  Again, I don't use a lot of S&P in my cooking, so go by what you like. 
 
I.Love.Soup.
The.End.


Chicken, Spinach & Mushroom Alfredo

OK, so how about I made this weeks ago and I'm just getting around to putting this on the good ole blog.  We had plans with a few friends, so of course I offered to cook!  It had been a while since I had some pasta...you know it's quite frowned upon on the Paleo diet.  But....you gotta enjoy it once in a while. 

This is not a typical uber thick alfredo.  Its light and yummy and comforting.  I am obsessed with spinach and mushrooms, so this combines my guilty pleasure of carbs with both of these veggies.  Lets get started, shall we?

Ingredients
2-4 chicken breasts (I know this is a large variation, but it all depends on the size of the breasts!)
3 Tbsp butter
1/2 yellow onion, finely diced
1 16oz package of baby bella mushrooms
1 5oz package of fresh baby spinach
2 Tbsp garlic
16oz heavy cream
3/4 tsp fresh ground black pepper
3/4 tsp salt
1/4 tsp fresh ground nutmeg (trust me, get yourself a microplane and grind your nutmeg!)
6 oz fresh grated Parmesan cheese
1lb fettuccini

Salt and pepper your chicken breasts, to taste.  Grill or sauté the breasts, however you please to cook them.  Just cook them, set them aside, and chop them up.

In a separate sauce pan add your butter and diced onion.  Saute until onions are translucent, 5-8 minutes.  Add mushrooms and let them cook down.  Mushrooms contain a lot of moisture and will release that into your pan, so leave it uncovered.


After mushrooms cook down, add your baby spinach and garlic.
It will look like a lot of spinach, but it will cook down quickly, in just a few minutes actually.  Start your pan of boiling water for your pasta.  Don't forget to salt your pasta water!  Get it boiling, add your fettuccini, stir, strain, blah blah blah.  Please tell me you an at least put pasta into water and cook it  Next add your heavy cream, pepper, salt, and nutmeg.  Stir until well combined and add chopped chicken breasts.  Next, shred your FRESH Parmesan cheese and add to your mushroom mixture.  Stir well so the cheese melts.  Simmer for several minutes, the sauce will thicken.
After sauce is well combine and slightly thickened, start adding your well drained pasta to your sauce pan.  Stir together and begin serving! 
Top your portions with some fresh flat leaf parsley and fresh ground pepper.  Hey and maybe some more Parmesan cheese!!!  Yummy.


Friday, August 23, 2013

Red Velvet Cookies with a Cream Cheese Glaze

So I was doing some grocery shopping at Walmart yesterday and I saw these red velvet cookies.  Of course I thought to myself..."I can totally make those...better than Walmart".  And while I did not buy them to compare, I did make up this recipe tonight...on a Friday night...just me and my oven.  Well I lied--I did go to Starbucks first, which is why I am still awake baking at 11:30pm.  For those of you who love my red velvet cake, I will never share that recipe.  That is for the bakery some day.  BUT, I will share this recipe with you.  Its delicious, like yummy yummy yummy.  Enjoy.
 
Ingredients:
1 C unsalted softened butter (2 sticks)
1/2  C sugar
1 1/2 Cups packed brown sugar
2 eggs
2 tsp red food coloring
2 1/2 tsps. vanilla extract
2 1/2 C flour
3/4 tsp salt
1 tsp baking powder
1 tsp baking soda
2 Tbsp cocoa powder
 
Preheat oven to 325 degrees.  In a large mixing bowl, cream together butter and sugars until well combined.  Add eggs, vanilla, and red food coloring.
 
In a separate bowl mix together flour, salt, baking powder, baking soda, and cocoa powder.  Gently and slowly add this mixture to your butter mixture and stir until well combined.
 
 
Side note:  Let your kids help in the kitchen.  They love to put on an apron, put in ingredients, and just help you bake.  My favorite part was always licking the beaters as a kid!  I ALWAYS let my daughter taste the batter.  Just don't let them have more than a few tastes, nobody should eat raw eggs.
 
 
Drop about a tablespoon sized scoop around 2 inches apart on an ungreased cookie sheet. 
 
 
My cookie sheet is getting dingy, huh?  Hey mom-take note...Christmas is coming up!  Anyways bake for 10-12 minutes.  Gently remove from cookie sheet and let cool.  Let's prepare the glaze!
 
Cream Cheese Glaze:
4oz softened cream cheese
1 1/2 C powdered sugar
1-2 Tbsp milk
1/2 tsp vanilla extract
1 Tbsp light corn syrup
 
Combine all ingredients in a small bowl.  Frost your cooled cookies and let the frosting harden.
 
 
These are good.  Sinfully good.  Not healthy.  But perfectly soul warming.

Monday, August 19, 2013

Gluten Free Chocolate Garbage Cookies

So have y'all seen the garbanzo bean cookies going around your Facebook posts?  A friend of mine "shared" a recipe, so of course I decided to modify it and make it my own.  Now this is my very first gluten free cookie.  Is it as good as a ooey gooey butter and sugar filled cookie?  Of course not.  Butter makes everything better, lets be honest folks.  But this recipe is nearly all natural AND gluten free.  And you can feel good about feeding these to your family.
 
Ingredients:
1 15.5oz can of garbanzo beans
2/3 c all natural peanut butter
2 tsp baking soda
1/8 c unsweetened cocoa powder
1/3 c unsweetened shredded coconut
2 Tbsp all natural honey
1 ripe banana
1 tsp vanilla extract
5oz dark chocolate chip (I prefer Ghiradelli 60% dark chocolate chips, but they were out of them at my grocery store)


Preheat your oven to 350 degrees.  Combine all ingredients, except dark chocolate chips in a food processor.  Process until combined and looks like cookie dough.  Add dark chocolate chips and pulse until just incorporated. 
 
Refrigerate for 20-30 minutes.  Using about one tablespoon of dough, form a ball and gently press down...looks like a mini hamburger, right?  Fill cookie sheet and bake in preheated oven for 12 minutes.  Allow cookies to cool on a wire rack.  Serve with a glass of milk...or almond milk...or soy milk...or whatever milk your diet allows you.  These cookies are chocolatey! 
 

Morning Breakfast Smoothie

Breakfast is the hardest meal for me.  I don't particularly love eggs, unless I'm dipping toast into a runny yolk.  Since I'm reducing grains, it's extremely difficult to find breakfast options that don't involve bread, cereal, or oatmeal.  Basically I alternate between two breakfasts:  two eggs with a sausage or a smoothie.  Neither of them keep me full for more than two hours, but they are both packed with protein.  My favorite smoothie recipe to date is:


Ingredients:
1 cup unsweetened vanilla almond milk
1 banana
1 cup frozen fruit (I get a mixture of strawberries, peaches, pineapple and mangoes)
1 scoop of strawberry protein powder.
 
Put it all in a blender and mix it up! 

 
I haven't ventured into "greens" for my smoothies yet, but maybe soon!

Sunday, August 18, 2013

Gringo Stuffed Chicken

So we had dinner with our dear friends/family this evening and Miss Trish merely "suggested" I make this stuffed chicken that I had made for her months ago.  In all honesty, I remember making it, but like every other recipe, I just made it up at the time.  I'm good at that...just winging it.  So that's why I need this blog--so I can keep track of what I make.  Someday when I have dementia, I'm gonna need something to remind me how to cook.  Anywho, Trish remembered a few of the ingredients I used, so re-made it up.  And voila, it turned out delicious again :)

Ingredients:
3lbs chicken breasts (I had a package of 4 very large chicken boobs)
1 package of cream cheese (the square block...you know?)
4oz can of chopped green chilies (use only 3oz)
1 1/2 C shredded cheddar cheese
2 Tbsp salsa
15 slices of bacon, cooked, drained and crumbled
1 egg
1 C panko bread crumbs
1 1/2 tsp paprika
1 tsp garlic salt

Preheat oven to 375 degrees.  Get yourself either a large zipper bag or two sheets of wax paper and pound out your chicken breasts until they're flattened.  How thin?  Oh I have no idea, just get it thinner. 
 
 
Raw chicken breasts are so gross, aren't they?  Just be sanitary, you know wash your hands and your prepping surface when you handle raw meats.
 
In a separate bowl, add cream cheese, 3oz diced chilies, cheddar cheese, salsa, and bacon.  Use a hand mixer and beat until well combined.
 
 
Get out two more dishes: one for the egg and one for the bread crumbs.  Add your egg to the dish and beat it.  In the second dish, mix together the bread crumbs, paprika, and garlic salt.  Set it up like so:


Next you will need to figure out how many chicken breasts you have versus the filling.  Since I had four breasts, I needed to "eyeball" 1/4 of the filling per breast.  Scoop the filling onto the middle of the chicken breast.

 
Roll up the ends and meet at the top.  Secure with toothpicks.
 
 
Now you will need to dip this chicken roll into the egg then into the panko mixture until all sides are covered.  Repeat this with all chicken breasts.

 
Align your breasts into a greased glass baking dish and bake for 35-40 minutes.  When they come out, the panko will be beautifully browned...and some of the filling will have oozed out and burned in some parts, which is absolutely delicious.  Eat the burned parts.  Don't let your spouse or your crumb snatching kids get any of that goodness...its your work of art...enjoy it :)
 
 
Look at that...you see that goodness coming out from each end?  You can thank me by leaving some feedback on my recipe :)  Good night folks. 
 
 Side note:  I really need to get better about taking "pretty" pictures.  Food is art, and you definitely eat with your eyes.


Thursday, August 15, 2013

Chicken Tacos with Black Beans

I love Mexican food...and Italian food.  I cook a lot of variations of both of these.  Tonight I had a taste for tacos.  And while I love the typical Americanized tacos with loads of cheese and sour cream, I am trying to eat healthy.  So tonight I made a fast, low fat, low calorie, and potentially Paleo version of Chicken Tacos.  And bonus...I get to use my dutch oven!  If you don't have one, buy one ASAP...best.invention.ever.


For the Chicken Tacos:
1 28oz can of diced tomatoes
1 medium yellow onion, diced
4 cloves of garlic, diced
1 1/2lbs of chicken breasts
1 1/2 Tbsp ancho chili powder
2 tsp cumin
2 tsp oregano
Salt an pepper to taste

Combine all 8 ingredients in your dutch oven (or pot).  Stir and let simmer over medium to low heat for 20 minutes.
 
 
In the meantime, lets start the black beans!
 
Black Beans
1 green pepper, diced
1 small yellow onion, diced
1 15oz can of black beans
2 Tbsp garlic
2 tsp cumin


Combine all ingredients in a pot on low and simmer for 20 minutes, until veggies are cooked down.  That's it!  So super easy.
 
While your chicken is still simmering, make your taco topping.  This is also delicious on top of the black beans!
 
Topping
1 small red onion, finely diced
1 good sized handful of cilantro (mmm I love cilantro!)
1 1/2 tsp freshly squeezed lime juice
dash of salt
 
 
Combine all ingredients and set aside.
 
After your chicken has cooked for 20 minutes, begin shredding the chicken with a fork and knife.  It should look somewhat like this:
 
 
Cover and reduce heat.  Cook for another 10 minutes, or as long as you would like the flavors to marry.  I have no patience, so I'm ready to eat now!
 
If you are using tortillas, pick corn tortillas please.  Heat them up individually on a skillet.  Using a slotted spoon to drain the liquid, drop chicken onto your tortilla.  Generously top with your onion & cilantro topping and add a side of black beans.  These beans also are fantastic on top of my garlic rice.  Yeah and they're also delish with a scoop of sour cream ;)
 
 
If you are going Paleo, use a romaine leaf as your "tortilla".  Same deal...use a slotted spoon to drain the chicken and scoop onto your leaf.  Top it with your onion & cilantro topping and add a side of not-so-paleo black beans :)


Easy right?  And fast!